
Introduction
The world of Dooria is complex. It’s a big machine, dressed as a city, with doors that work as portals into different areas. This guide is here to help you navigate it and make some sense of its concepts. You can accomplish that without a guide, but it’s a challenge that requires an amount of attention and patience that most people may not have time for. You are, however, highly encouraged to at least try the game on your own at first. In fact, get a piece of paper and a pen and take notes as you go, it may prove helpful. If you do become hopelessly stuck, confused, feeling like you’re missing something, or simply wishing to understand more about the game, come back here for some help.
This guide is in three parts. Part One looks at various gameplay elements, Part Two briefly explores the narrative concept behind the game, and Part Three is a walkthrough. Some areas of this guide will inevitably contain spoilers, but a warning will be given prior to anything major.
Part One: Gameplay
CHAPTER 1: GETTING AROUND
Menus
The game can be played with a keyboard or a controller. Throughout the guide, whenever new controls are introduced, keyboard controls will be listed first, followed by controller ones in parentheses. After the controls are introduced, they’ll simply be referred to either by their direction or their action name.
In Dooria all menu navigation is done with directional navigation, using the UP, DOWN, LEFT and RIGHT arrow keys (Up, Down, Left and Right direction on D-pad), and your selections are accepted with an Accept action by pressing the ENTER key on your keyboard (bottom Action Button). Most of the time, for ease of use, the Up direction will also work as Accept action.
The Main Menu is made up of two sections - the Title Screen and the Shell Menu. The Title Screen is where you start a new game, continue your current game, or quit the application. The Shell Menu is where you can select your language and view the controls.

When you launch the game for the very first time, you’ll start in the language section of the Shell Menu. Use the Up and Down controls to choose your language. Once you’ve made your choice, press Right to go to the next screen that contains a door. If you press Right one more time, you’ll go to the screen that describes all the controls. Take note of it and press Left to return to the door. Press Accept to walk through the door and enter the Title Screen.
You can always return to the Shell Menu later by pressing Down in the Title Screen. Once on the Title Screen, you’ll be presented with a single door. Enter it to start the game (Accept action).
You’ll watch the intro, and when it’s over, you’ll arrive at the first tutorial level and regain player control. At this point you can also use the Pause action by pressing Esc on your keyboard (Start Button) to open the Pause Menu. If you do that, a drop down menu will appear and you will be presented with the option to exit to the Main Menu.

Choosing NO or hitting Pause again will resume your game. If you choose YES, you’ll leave the current puzzle and return to the Main Menu. Now you’ll see three doors. Green door, on the left, quits the game. Center door continues your current game. Red door, on the right, deletes all your progress and starts a new game.

There’s no need to save - your progression through the game is saved automatically. One thing to keep in mind is that your in-puzzle progress is not saved, so if you leave your game mid-puzzle, next time you load the puzzle, it will be reset to the starting position.
Movement
Navigation in Dooria is quite simple. You can walk left and right, you can enter a door, you can check the other side of the puzzle, and you can pan the camera up and down. That’s it. Sometimes you’ll find yourself up on a ledge. To jump down simply hold down the direction in which you want to jump down (either Left or Right). You cannot jump across gaps or further than a single column width.
The controls are as follows:
Walk left - LEFT ARROW (Left on D-Pad), hold to jump down from ledge
Walk right - RIGHT ARROW (Right on D-Pad), hold to jump down from ledge
Enter door - UP ARROW (Up on D-Pad)
Activate/deactivate vision of the other side of the puzzle - DOWN ARROW (Down on D-Pad)
Pan camera up - number 9 (Up on Right Stick)
Pan camera down - number 0 (Down on Right Stick)
Pause Menu/Close Pause Menu - ESC (Start Button)
Accept/Select menu option - ENTER (bottom Action Button)
Some keyboard control hints appear throughout the game, on pieces of paper taped to walls. You can always view full controls in the Shell Menu.

Also, the Pause Menu has an abbreviated controls diagram, if you’re ever in need of a quick reminder during the game.
CHAPTER 2: BASIC GAMEPLAY CONCEPTS
Facing in the opposite direction and side flipping.
Imagine for a second you’re looking in a specific direction. Some things will be on your right and some on your left. Now turn around and face in the opposite direction. The things that were on your right are now on your left and vice versa.
Add a couple of doors. Walk through the one on the right. Turn around and face the door. Now the one you came out of is on the left (fig.1). This is the basic spatial relationship between the two sides of the puzzle. Every time you switch from one side to another, think of it as simply turning around. Let’s call the first side Side A, and the other side Side B.

Door rules.
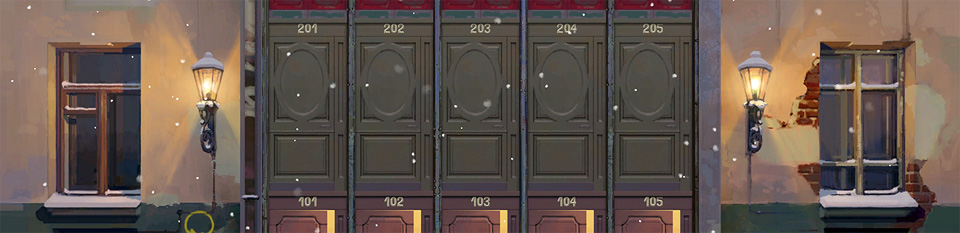
That by itself of course is not very interesting. So let’s add a few more doors, and some rules to spice things up. First we make a grid, say 5 doors wide and 3 doors tall. That’s a lot of doors, so to help us keep track of them, let’s number them in the following manner: first digit of the number will indicate the row, and the last digit will indicate the column, and they’ll be separated by a zero to make it easier to read. Think hotel door numbering. So for example the first door in the first row will be 101, the third door of the second row will be 203, etc. Imagine these rows as floors of a building. And to make things even clearer, let’s make it so that all of the doors in the same row look the same (fig. 2). There will be exceptions. In the game you’ll notice that some doors don’t have numbers and may even look different from other doors of the same row, but they still function as if they did have a number, you’ll just have to note which row they were in originally. (fig. 2)

Keep in mind that when you’re on the other side, right and left are flipped, so the door order will be flipped as well (fig. 3).

Keep in mind that when you’re on the other side, right and left are flipped, so the door order will be flipped as well (fig. 3).

When you start a real puzzle in the game, you’ll always start on side A, and all of the ground level doors will be open, so you have a number of doors to choose from. The gameplay will go something like this. Pick a door and walk through it. It collapses, and the screen switches to the other side, where you exit. You’ve exited the door on Side B and turned around to face it. Now we introduce another rule. When you come out of a door, it shuts behind you, and you can’t re-enter it. However, there are doors you can enter. The puzzle knows which door you came out of, and it unlocks all the other doors that belong to the same row. For example if you came out of a door 102, doors 101, 103, 104, etc will be open. If you came out of a higher row door, such as 202, 302, etc, some of the open doors may be out of reach (fig. 5), but we know how to bring them down.

Up to this point, we’ve been thinking about walking through a door in a way that we’re all familiar with. You enter it on one side and come out on the other side of the same door. But now, let’s examine a slightly different mechanism. Imagine for a second you have a house, with a kitchen and a bedroom. The kitchen is downstairs, and the bedroom is upstairs. The bedroom has a door, and the kitchen has a door. They’re two different doors in two separate parts of your house. Normally, if you wanted to get from the bedroom to the kitchen, you’d pass through the bedroom door, walk through the hallway, take the stairs down, and then pass through the kitchen door. But now imagine you open the bedroom door, and what you see through it is not the hallway, but the kitchen, and if you walk through it, you’ll enter the kitchen right away. That’s how a portal works. And that’s actually how the doors in the game work. If you enter the door on side A, when you come out on side B, that’s a different door you just came out of. For example you enter door 203 on side A, but come out of door 103 on side B. In fact, the door on the other side might not even look the same as the one you entered (fig. 6).

Because of that, what happens to doors on one side does not have to have any effect on what happens to doors on the other. And you’ll find that it doesn’t. And this allows for the two sides to move independently and to have different rules and mechanics. And it is this independent manipulation of the two sides that allows you to solve the puzzles (fig. 7).

Let’s continue where we left off and pick an open door on ground level, and enter it. It collapses, and we exit on side A again. We can see that the door we entered earlier on side A is still collapsed and the door that was above it is at ground level. We can’t enter it yet, because it belongs to the second row, and we’ve come out of the first, however at this point you have all the tools needed to bring those other doors down.
So what happens when you’ve brought down to the ground level the doors from the very top row? Another rule comes into play. Top row doors are called Finish Doors, and entering them solves the puzzle. You can learn more about that in Chapter 3.
We’ve looked at a basic puzzle here, but different puzzles have different rules and behaviors. In Chapter 3 we’ll look at all the components of all the puzzles and the behaviors they introduce, but for now here’s the summary of the fundamental rules that are universal to all the puzzles:
- Entering a door alters the door grid in some way that allows progression
- When you come out of a door, it shuts behind you and you cannot re-enter it
- Doors with the same row number look the same (unless it’s a special door, see chapter 3)
- You can only enter doors that have the same row number as the one you came out of
- A puzzle is solved by entering any of the doors from the top row
Solving The Puzzles
Now that we have some understanding of the mechanics, how do we actually approach solving the puzzles? Well, here are some hints and suggestions. When you begin a puzzle, familiarize yourself with both sides - this might help you decide which door to start with. You’ll still begin with a trial and error approach, and that’s ok, but you should have an idea of what you want to do, even if it’s not the correct one. On the first few attempts you should focus on learning that particular puzzle’s rules and mechanics. Once you understand how it works, you can start to develop a strategy. Pick a target side (A or B), and try to solve on that side. Try to think at least two or three steps ahead, for most people it’s harder to see further than that. If you’re hitting too many dead ends, don’t hesitate to scrap your current strategy and try something radically different. For example, try starting with a different door. As you become more and more familiar with a puzzle, you’ll be able to memorize your path fully, experiment and make adjustments. If you’re stuck, try solving on the other side, it might be easier. Don’t rush, there’s no time limit. Take notes if you have to. And if you’re truly unable to figure it out, you can check the puzzle solutions in Part Three of this guide.
CHAPTER 3: DOOR TYPES AND PUZZLE ELEMENTS
Spoiler warning: This chapter reveals different door types and some of the more advanced puzzle mechanisms. If you wish to discover them on your own, skip this chapter.
Finish Doors

You may have noticed that the top row doors don’t have numbers, but instead have a green triangle arrow on them. These are the Finish Doors, and they lead to the next puzzle. Side A and side B have different Finish Doors. That means you can choose where to go next. Early in the game you’re not given any clues as to which you should pick, so at this point it’s entirely up to you. Some Finish Doors won’t take you to the next puzzle right away, and may deposit you in an area called the Fountain Square (see Chapter 4 - Encounter Spaces) or a Hint Space (see Chapter 5 - Solving The Path), from which you will proceed to the next puzzle. You may also notice that the Finish Doors look the same as the first row doors of the puzzle they take you to, or, if not going to a puzzle, they’ll look like the first door at whatever area you arrive at. This is how you can identify which Finish doors lead where, once you start planning your path.

Reset Door

In any of the puzzles, you can walk to the far left side, to a spot which in earlier puzzles is marked by a circular arrow symbol on the wall. This will lower a red door with the same symbol on it. Entering that door will reset the puzzle. You may choose to use it at any time and for whatever reason. For instance, if you’ve run out of doors you can enter and can’t proceed anymore, or if you’ve decided you don’t like where your current solution is taking you and want to try a different approach.
Skip Door

Opposite of the Reset door, all the way on the right, is another door that lowers. It’s green, with arrows that look like a fast-forward symbol. When you’ve solved a particular puzzle, and return to that tier version again, usually in New Game Plus (NG+), the Skip door will come down and let you bypass having to solve the puzzle again on that particular side. For instance, if you’ve solved it on side B, the Skip door will only be available on side B. It essentially functions as that side’s Finish Door, except you can enter it right away. More on Skip Door in Chapter 6 - The Skip Door.
Universal Door

This door adds two additional behaviors to any puzzle it’s in: 1) A Universal Door is not row specific and can be entered from any other door, as long as it’s accessible via ground or a ledge; 2) When you exit a Universal Door, it shuts behind you but ALL OTHER DOORS become open. This makes Universal Doors extremely useful for solving puzzles in a new way, such as to access a door you previously couldn’t get to. Universal Doors are not available from the start of the game, and only start to appear in puzzles once you’ve solved the Bus Puzzle. However, once unlocked, they will populate all of the puzzles that can have them and will even be available in NG+. Only deleting all your progress and starting a brand new game will remove them.
White Doors
Tier 2 puzzles will have a White Door in the top row. These doors take you to special areas, called Hint Spaces, which give you hints about The Path and explain how to approach and solve it (see Chapter 5 -Solving The Path). These areas are only detours, from which you continue to wherever you would have gone had you entered a normal Finish Door. Because of the valuable things revealed behind the White Doors, they are usually very difficult to get to, and almost always require the use of Universal Doors. You have to visit several of them in order to be given enough hints to actually understand and solve The Path.
Wheel Doors

Tier 3 puzzles will have at least one Wheel Door in the top row. These doors are hard to get to and will take you to an area called the Wheel of Doors (see Chapter 4 - Wheel Of Doors).
Blocks

Some of the puzzles will have blocks that occupy a few of the door slots, either from the start or by rising from the ground to replace a door you’ve entered. Blocks have ledges on top of them which you can stand on (and jump down from, if you need to). Since a block is solid, you cannot pass through it in either direction. This means that when passing from the opposite side into a slot occupied by a block, you will be automatically bumped up and exit out of a door that’s above the block, onto a block ledge.
Ledges

Some puzzles can have ledges on rows 2 and above. Ledges have to be activated by passing through doors. When you enter a door, a ledge is added above it. Sides that have ledges do not have doors or blocks that move, and you reach higher rows by exiting onto ledges. In order to exit onto a ledge, you have to enter a corresponding row door from the opposite side. For example, if you enter 201 on side A, you’ll exit onto a ledge from 201 on side B. If no ledge exists in front of the door, it will be created for you when you exit out of the door.
Clocks

Clocks exist in all areas except tutorials. They show time in 5 minute increments. Time is advanced by 10 minutes when you traverse between puzzles. Time is advanced by 5 minutes when you traverse from a puzzle to an Encounter Space.
CHAPTER 4: LOCATIONS
Spoiler Warning: This chapter reveals all the locations in the game. If you wish to discover them on your own, skip this chapter.
There are three types of locations - puzzles (let’s label them with the letter P in the descriptions below), encounter spaces (we’ll label them as ES), and the Wheel Of Doors.
PUZZLES
First, let’s look at the puzzles. There are 2 tutorial levels, and 9 active puzzle areas (there’s one inactive puzzle area that has a special function). 7 of the puzzle areas have up to three difficulty tiers. Each time you return to a puzzle areal, its puzzle will advance to the next difficulty tier, until you reach the final tier. Finish Doors may vary between tiers. Additionally, as mentioned earlier, White Doors will appear in tier 2 puzzles, and Wheel Doors will appear in tier 3 puzzles. Side A of each puzzle faces the street, and side B of each puzzle faces the interior.
The tutorials are easy to solve and have no optional paths, so we’ll ignore them in this guide and only focus on the 8 puzzle areas. They will be listed in the order you’re most likely to visit them. The correct order to visit them will be explained later.
Apartment Building
This is the first real puzzle, but it is very easy to solve and can be solved on side A without much thinking. Solving on side B requires a bit more planning and understanding.
Difficulty tiers: 1
Puzzle size (number of doors): tier 1 - 3x5
Tier 1 Finish doors lead to: side A - Café (P), side B - Library (P)
Puzzle mechanic: falling doors on side A and side B
Universal Door: available on tier 1
Café

This is where things get a bit trickier, this puzzle is hard to solve casually, and will likely require multiple tries. Doors no longer collapse, but instead get replaced by blocks that rise up to cover the door. Tier 1 Finish Doors vary depending on where you’re coming from. See below.
Difficulty tiers: 3
Puzzle size: tier 1 - 3x5, tier 2 - 4x5, tier 3 - 5x6
If coming from Apartment Building, then tier 1 Finish Doors lead to: side A - Bridge Tower (P), side B - Library (P)
If Coming from Library, then tier 1 Finish Doors lead to: side A - Theatre (P), side B - Bridge Tower (P)
If coming from Bridge Tower, then tier 1 Finish Doors lead to: side A - Theatre (P), side B - Library (P)
Tier 2 Finish Doors lead to: side A - Theatre, side B - Bench (ES)
Puzzle mechanic: rising blocks on side A and side B.
Universal Door: available on tiers 2 and 3
Bridge Tower

This is the first puzzle that introduces Ledges as a mechanic. Due to the nature of how Ledges work, tier 1 Bridge Tower can only be solved on side A. Tier 1 Finish Doors vary depending on where you’re coming from. See below.
Difficulty tiers: 3
Puzzle size: tier 1 - 3x5, tier 2 - 4x5, tier 3 - 5x7
If coming from Cafe, then tier 1 Finish Doors lead to Library (P)
If coming from Library, then tier 1 Finish Doors lead to Cafe (P)
Tier 2 and 3 Finish Doors lead to: side A - Bridge (ES), side B - Train Station (ES)
Puzzle mechanic: side A - falling doors, side B - ledges
Universal Door: available on tiers 2 and 3
Library

Depending on your path, this might be the first time you encounter Blocks. Tier 1 Finish Doors lead to different locations based on where you’re coming from. See below.
Difficulty tiers: 3
Puzzle size: tier 1 - 3x4, tier 2 - 4x5, tier 3 - 5x6
If coming from Apartment Building, then tier 1 Finish Doors lead to: side A - Bridge Tower (P), side B - Cafe (P)
If coming from Cafe, then tier 1 Finish Doors lead to: side A - Theatre (P), side B - Bridge Tower (P)
If coming from Bridge Tower, then tier 1 Finish Doors lead to: side A - Theatre (P), side B - Cafe (P)
Tier 2 and 3 Finish Doors lead to: side A - Theatre (P), side B - Fountain (ES)
Puzzle mechanic: falling doors on side A and side B
Universal Door: available on tiers 2 and 3
Theatre

This is the first time you encounter the matching door mechanic. Whenever you exit a door, the adjacent columns on the left and the right move either down or up so that the adjacent doors are the same as the one you came out of. Fun fact - the stage decorations represent 6 of the 9 puzzle areas and the Windmill.
Difficulty tiers: 3
Puzzle size: tier 1 - 3x5, tier 2 - 4x5, tier 3 - 5x7
Tier 1, 2, and 3 Finish Doors lead to: side A - Bridge Tower (P), side B - Street (ES)
Puzzle mechanic: matching doors on side A and side B
Universal Door: available on tiers 2 and 3
Cathedral

This is an optional puzzle - it is possible to get to the ending without ever visiting it, although that’s unlikely to happen. There’s no benefit to avoiding it, it is simply a possibility and a consequence of the game’s non-linear structure.
Difficulty tiers: 3
Puzzle size: tier 1 - 4x5, tier 2 - 5x5, tier 3 - 5x7
Tier 1, 2, and 3 Finish Doors lead to: side A - Bus Stop (ES), side B - Train Station (ES)
Puzzle mechanic: side A - rising blocks, side B - ledges
Universal Door: available on tiers 2 and 3
Bus Ride

This puzzle introduces Universal Doors, and if you complete it, Universal Doors will be unlocked in other puzzles, where available. This is an optional puzzle - it is possible to get to the ending without ever visiting it, meaning you may or may not unlock Universal Doors during your first playthrough.
Difficulty tiers: 3
Puzzle size: tier 1 - 4x5, tier 2 - 5x5, tier 3 - 5x7
Tier 1, 2, and 3 Finish Doors lead to: side A - Library (P), side B - Cafe (P)
Puzzle mechanic: falling doors on side A and side B
Universal Door: by default on all tiers
Train Ride

Finishing this puzzle on side B is the only way to get to the Decommissioned Puzzle
Difficult tiers: 2
Puzzle size: tier 1 - 4x5, tier 2 - 5x6
Tier 1 and 2 Finish Doors lead to: side A - Windmill (P), side B - Decommissioned Puzzle (this one is neither a puzzle, nor encounter space, but we’ll look at it in this section)
Puzzle mechanic: side A - matching doors, side B - rising blocks
Universal Door: available on both tiers
Windmill

This is the final puzzle. Depending on when you get here, finishing it on side A may trigger the game’s ending. The Windmill powers all the mechanisms in the world of Dooria, and you can see axles going off to all the puzzle locations. Notice that the Finish Doors on side A, which lead to the Windmill Balcony, have a different arrow above them, and are the same doors that Oscar enters in the game’s opening.

Difficulty tiers: 1
Puzzle size: tier 1 - 5x7
Tier 1 Finish Doors lead to: side A - Windmill Balcony (ES/Ending), side B - Wheel Of Doors
Puzzle mechanic: side A - falling doors, side B - ledges
Universal Door: available on tier 1
Decommissioned Puzzle

This area can only be accessed through side B Finish Doors of the Train Ride. This is an odd space, the puzzle here is partially disassembled and non-functional. No puzzle solving happens here. Instead it’s geared more towards the narrative. It shows some of the “guts” of the puzzle mechanisms, and it also has one open door above, where you can sometimes see Oscar in his current location. This is very useful once you’re trying to figure out his path.
Difficulty tiers: N/A
Exit door leads to Cathedral
Puzzle mechanic: N/A
Universal Door: N/A
This completes the puzzle areas. Now let’s look at the Wheel Of Doors.
WHEEL OF DOORS

If you finish the Windmill puzzle on side B, or enter any of the Wheel Doors in other puzzles, you will access a master location at the top of the Windmill called the Wheel Of Doors. The Wheel contains 8 doors around its perimeter for each of the puzzle areas, except for the Windmill itself. The Wheel turns in intervals, every few seconds putting a new door into the access area on the right. If you stand in the access area, the Wheel stops turning. If you walk away from the access area, the Wheel resumes its rotation. This allows you to select and enter any of the doors that are on the Wheel. Entering one of the doors teleports you to that puzzle location, however, to get back to the Wheel, you’ll have to either take the long way through all the puzzles again, or enter a Wheel Door in any of the puzzles, if available. Because of this, the Wheel Of Doors is not really a useful level selector. Rather, it’s a rare shortcut to a puzzle area you may have missed or a way to explore a different path. It becomes much more useful in NG+. One other helpful thing: you can see the Windmill Balcony through the windows behind the Wheel. Past a certain hour, Oscar will arrive on the balcony and will be visible through the windows on the left.
ENCOUNTER SPACES
Finally, let’s look at the encounter spaces. This is where you can encounter Oscar, and figure out his path. Unlike puzzle areas, six out of the seven encounter spaces are located in an open area, called the Fountain Square, where they are arranged in a single line, which allows them to be visible from one another. You can also see the Windmill from all of them, except the Bus Stop, where the view is blocked by the Train Station.

Encounter spaces have two doors, one you’ve entered through on the left, and an exit one on the right, that leads to the next puzzle area. The spaces themselves are not interactive, they’re exclusively for observing. If you cross paths with Oscar when he’s in the same encounter space, a short interaction will play out automatically. To help with judging time, in addition to having advancing clocks, encounter spaces change visually based on the time of day, where the light shifts from early hours of the morning until the end of sunrise, where it becomes permanently overcast.
There are 7 encounter spaces, they’re arranged in a row from North to South, and that’s the order we’ll look at them, even though that’s not necessarily the order you’ll visit them in.
Bench

This encounter space is on the way from Café to Theatre, and can be accessed by finishing tier 2 and 3 Café puzzles on side B. It faces South. A legible clock can be seen at the top of a large cathedral-like structure beyond the Bridge. The Bench provides a fairly complete view of other encounter spaces, since it is at the end and unobscured by other structures. Only spaces you cannot see are the Bus Stop, because it’s behind the Train Station, and the Windmill Balcony, because it’s too far away and on the opposite side of the Windmill.
Encounter spaces that can be seen from the Bench are Fountain, Street, Bridge, and Train Station.
Fountain

The Fountain is on the way from Library to Theatre, and can be accessed by finishing tier 2 and 3 Library puzzles on side B. The Fountain encounter space faces South, and the only visible clock here is up on the Bridge. From the Fountain you can see the Street, Bridge and Train Station encounter spaces.
Street (x2)

This encounter space is on the way from Theatre to Bridge Tower. Finishing the Theatre puzzle on side B of any tier takes you here. The Street encounter space faces North. A clock tower is clearly visible on the right. The Bench and Fountain encounter spaces are the only ones that can be seen from the Street. The Street is the only encounter space with multiple encounters - there are two specific time slots, during which you can have a Street encounter, and you’ll have to do both in a single playthrough to complete all of the encounters.
Bridge

Finishing tier 2 or 3 Bridge Tower puzzles on side A will take you up onto the Bridge. This encounter space leads you to the Cathedral puzzles. When on the Bridge, you may end up facing North or South depending on the time of day. There’s a clock attached to one of the Bridge Towers. From the Bridge you can see either down towards the Train Station when facing South, or down towards the Bench and the Fountain when facing North.
Train Station

There are two ways to get to the Train Station. One is to finish tier 2 or 3 Bridge Tower puzzles on side B. The other is to finish any of the Cathedral puzzle tiers on side B. In the Train Station encounter space you end up on the train platform. It faces North, and you can see the Street, Bridge, Fountain, and Bench in the distance. There’s no apparent exit door, but soon a train arrives. When you enter it, you end up in the Train Ride puzzle area. The train platform has a clock on it.
Bus Stop

Side A of any tier of the Cathedral puzzles will take you to the Bus Stop encounter space. It faces North. You can see the train platform from here, and some of the Bridge. The other encounter spaces are obscured by the Train Station building with the large clock on it. Just as with the Train Station encounter space, there’s no apparent exit. You have to wait a few moments for the bus to arrive. Once you get on the bus, you reach the Bus Ride puzzle area.
Windmill Balcony

This is both an encounter space and an ending space, depending on when you get there. Finishing the Windmill puzzle on side A will take you to the Windmill Balcony. It faces South. You are high above the city, with no view of the other encounter spaces. None of the clocks are near enough to be of use, but the exit leads to the Wheel Of Doors, which has a clock.
You can see what looks like other windmills, though actually the game space repeats infinitely into the distance, with the windmill being the border between the repeating sections, so technically there’s only one windmill and when you’re looking at the ones in the distance here, you’re actually standing on all of them and looking at the back of your head. This doesn’t have any special significance other than allowing you to see the Windmill regardless of which way you’re facing.
Finally, here’s the map of the gameplay area, to give you a better idea of where you are relative to other locations.

CHAPTER 5: THE PATH
There are a number of ways to navigate the game world, not all of them get you the same outcome. This chapter will explain what’s going on and how to go about it. Spoiler warning is in effect.
Oscar

There’s another character in the world of Dooria. He wears a bright orange scarf, and we’ll just refer to him as O(range) Scar(f), or Oscar for short. You first meet Oscar in the opening, and he enters Dooria before you. Throughout the game you may come across him a number of times, and ultimately he waits for you at the end of the game on the Windmill Balcony. How that ending plays out depends on how many times the two of you intersect, which is affected by your path through the game.
Solving The Path
You can only come across Oscar in encounter spaces. When you enter an encounter space, one of two things can happen: either he’s there and you get a cutscene where the two of you wave to one another, or there’s nobody there, and all you can do is walk from one door to the other.
When you come across Oscar, and the two of you acknowledge each other and wave “Hello”, it’s called an encounter. During your very first meeting in the opening, as he makes a personal gesture and hands you his umbrella, the windmill blades start to spin. At first they’re all white. Every time you have an encounter after that, one of the windmill blades turns orange. There are 8 blades, one for each new encounter opportunity. You get one by default, because it happens on the Windmill Balcony at the end of the game, so you always get at least one orange blade by the time the game is over. Other encounters can all be missed. There’s a specific path through the game that gets you all of the possible encounters. And there’s a method for figuring it out. This method is visually presented with hints located in special areas, called Hint Spaces, accessed through the White Doors. Each Hint Space reveals another part of the method, for instance the spots where to look for Oscar in the encounter space you’re heading to next.

This method requires observation and some deductive reasoning. The best way to explore it is in NG+.

It works like this. As mentioned above, when you enter an encounter space, either Oscar is there or he’s not. If he’s there, you’ll have a successful encounter. Note the time and location - now you know when to visit this particular encounter space. Hopefully you remember which puzzle you came from, and what side you’ve finished it on. Note that too. Now, if he’s not there, then either he will be visible in the distance in one of the encounter spaces you can see (you’ll have to look closely to spot him, but he’s easy to find once you know where to look), or he won’t be anywhere. If you can see him in another encounter space, note which one and what the time is on the clock - now you’ve identified when and where to be next time. If he’s not there, then he’s at one of the encounter spaces you cannot see. Note all of the encounter spaces that he might be at, and the current time. You’ll narrow it down later.
Example 1: You enter the Bench encounter space at 5:20. He’s not there. You look in the distance and see him walking across the Bridge. Now you know at 5:20 you need to be on the Bridge to have an encounter.
Example 2: You enter the Fountain encounter space at 5:50. You do not see him anywhere. That means he’s either at the Bus Stop, Bench, or Windmill Balcony. You write down all those possible locations and the time.
If the case is such that you cannot see him anywhere, and multiple encounter spaces are possible as his alternative location, you can try to get to one of those locations at this exact same time (either by playing through the game again, which is less optimal, or by using the Wheel Of Doors’ NG+ feature) and see if he’s there, thus narrowing it down further. For instance, after Example 2, you visit the Bus Stop at 5:50, and see that he’s not there either. Now you know that at 5:20 he’s not at the Fountain, or on the Bridge, or at the Train Station. This leaves the Windmill or the Bench. So let’s say next you try to visit the Bench at 5:50. If he’s there, great. If he’s not there, then the only other place he could be is the Windmill Balcony. Either way you’ve identified another location and time. You can map his entire path using this method.
In the process of mapping his path, you should start to get an idea of the path you yourself should take in order to get to those encounter locations at the right time. If you keep track of how the levels connect and how the time advances, it should be pretty straightforward. Pay attention to the Windmill blades. The number of orange ones indicate how many encounters you’ve had so far, and what you have left.
CHAPTER 6: NEW GAME PLUS
Consecutive Playthroughs
After completing your first playthrough, you get the option to start the game again, but retain your ability to skip any puzzle tiers and sides you’ve already solved. This is called New Game Plus (NG+). To start it, on the Main Menu screen select the center door, which will now have the NG+ symbol that looks like a level reset symbol but with a plus inside it.

You will be told you’re starting New Game Plus. Accept and continue. After the intro, the game will skip both tutorial levels and start you in the Apartment Building puzzle.
If you play all the way through NG+ and finish it, you’ll get the option to start another NG+, and if you do that, the game will remember all the puzzles you’ve solved on your first playthrough and on NG+, and you’ll have access to the Skip Door in any of them. And so on and so forth. There’s no limit to how many times you can start NG+. Only requirement is that you get to the end of your current one. If you want to, you can use this to solve all the puzzles on all sides.
The Skip Door
We’ve talked about the Skip Door earlier in this guide, but let’s take a deeper look at it and also how it relates to NG+. The green Skip Door is located on the right side of the puzzle grids. Initially it’s inaccessible and even if you stand under it, it won’t descend all the way to the ground level. This way you cannot skip puzzles that you haven’t solved yet. Once you solve a puzzle, it becomes skippable on the side (A or B) and tier that you’ve solved it on. For instance if you’ve solved tier 2 Café on side B, which leads to the Bench, next time you come to tier 2 Café, the Skip Door will descend to the ground level on side B. Entering it will take you to the Bench without needing to solve the puzzle on side B again. You do not have to use the Skip Door, you can choose to solve the puzzle on another side, or try to get to the White Door or the Wheel Door, it’s up to you.
Because puzzle areas advance their tier every time you return to them, the only tier you can revisit in a single playthrough is the highest tier for that puzzle area. For instance once you’ve solved tier 3 of Café on side A, you can use the Wheel Of Doors’ puzzle selection to return to the Café puzzle area. Since tier 3 is the highest possible for Café, you’ll return to the puzzle you’ve already solved on side A, and now you’ll have access to the Skip Door on side A.
When you start NG+, you progress through the puzzles from the lowest tier again, which means you’ll visit all the tiers you’ve solved, and will be able to skip them on whichever side you’ve solved them on.
NG+ Wheel Of Doors Time Travel
Another feature of NG+ is an extra function added to the Wheel Of Doors. In addition to being able to select which puzzle area you want to go to, you can now set the current game world TIME. If you visit the Wheel Of Doors in NG+, small circular doors with a “+” symbol on them, above the door selector, open up to reveal a clock. The clock reads 4:15, which is the earliest possible time in the game world. Stand in front of the door of your choice and press the DOWN ARROW on your keyboard (Down on D-pad) to advance this clock in 10 minute increments. If you enter the door, new game time will be set to whatever the clock shows. If you do not enter the door and walk away from it to resume the Wheel’s rotation, the clock will rewind back to 4:15 - this is useful if you’ve overshot the time you wanted to set. For reference, current time will be shown on the clock above the entrance door in the center of the Wheel.

Part Two: Story
The Beginning
The opening cutscene starts in a dark, rainy void. Our character is walking past shadowy doors, scattered throughout. And then, one opens. An opportunity. A new, unknown path. Inviting, but risky. And suddenly someone else comes along, a stranger, also traveling through the void. They’re curious about the door, and plan to enter it. Do you want to go together? Perhaps not, perhaps you’re not ready to join anyone, or maybe it’s not what you’re looking for and would rather continue down the familiar path. They offer you a parting gift - their umbrella - a little protection from the rain, a little comfort, a little memento. They enter the door. A brief moment alone again. A moment of doubt. Should you have gone together? The door is gone, and a different one has taken its place, inviting you in. The light from it is fading, you’re about to lose this opportunity as well. A last minute change of heart. Maybe you can find something new. Maybe you can still catch up with the stranger and no longer be alone. You rush to enter it, and it shuts behind you.
Now you’re in a different world. Free of darkness, but unfamiliar and confusing. And there are more doors. You do not know how things work, you do not know where you’re supposed to go. There’s no sign of anyone else. You’re still all alone, faced with nothing except doors, but at least now there are options. Every door leads somewhere. You pick one and step through.
Symbolism
Dooria mimics life in a way that you feel like you’re making rational choices, but ultimately you don’t know all of the factors, and so you can’t really know if it’ll work out in the end. Multiple versions of the ending, some more satisfying than others, represent the uncertainty of outcomes. You can always try again, spend a bit more time in the game world, maybe figure out the overarching mechanism, and make different choices to see if you get an ending that feels better. The game isn’t really concerned with pleasing anyone, it just offers you the structure, and the tools to figure it out with. The ending is ultimately not important, it is simply a result of two factors - the choices you’ve made, and luck. The more work you put in, the less luck becomes a factor, but ultimately, it’s always there to some degree.
There are two narrative concepts. One is of a person simply dealing with obstacles to move forward, a person comfortable on their own but appreciating the moments when they intersect with someone else, if they do.
The other is of a person developing a desire for companionship, yet companionship does not come easy. Opportunities are rare and hard to come by, and so it takes a while to build up enough comfort around a stranger to actually get closer.
The world gives passive feedback of how things are going, which one can either use or ignore, depending on which concept one is guided by.
The above ideas are not directly expressed anywhere in the game, and serve more as an underlying structure upon which the world of Dooria is built. If they truly exist anywhere, that would be in the mind of the game’s creator. Let’s say they’re abstract concepts that inform and inspire creative choices, rather than themselves being the creation. It’s the part of the painting that’s not painted and is merely implied. It’s the shadows cast on a wall by an idea you cannot see. This leaves the game's actual narrative content intentionally vague and open to interpretation. Everyone is welcome to have their own take on what’s going on and explore questions that can be viewed from different angles, based on one’s life experience, beliefs, and philosophies. For instance, why don’t the characters approach each other? What is the Windmill? What does the umbrella represent? Are they alone in Dooria, and what IS the world of Dooria? A metaphor? An actual place? Or both?
The characters themselves are minimalist and have no official names, nor faces, nor language beyond gestures, because it’s not about them specifically, it’s about their experience, which is broad and universal.
Part Three: Walkthrough
Spoiler warning: this part explains all the solutions and the endings.
CHAPTER 1: PUZZLE SOLUTIONS
If you’re stuck, these are the solutions to all the puzzles. They’re listed in the following format:
(Location) (tier number) (Universal Door unlock status): (target finish side and/or special door)
where Universal Door unlock status is blank if you haven’t unlocked them yet, or marked as Universal, if you have.
For example if you haven’t unlocked Universal Doors yet, and want to solve the tier 2 Café puzzle, and finish on side B, you’ll look for the solution that says:
Café 2: side B
Or if you’ve unlocked Universal Doors, and are trying to get to the special White Door on the tier 2 Café, your solution is under:
Café 2 Universal: White Door
Starting side is designated as side A, and the reverse side is side B. The winning Finish Door is at the end of each list of steps, and is marked with an exclamation.
In some of the puzzles exiting through a special door (White Door or Wheel Door) may be your only option.
Apartment 1: side A
A101 B102 A103 B101 A203 B104 A102 B201 A202 B204 A105 B103 A302!
Apartment 1: side B
A101 B102 A103 B104 A102 B204 A105 B103 A202 B203 A201 B105 A203 B304!
Café 1: side A
A103 B105 A102 B104 A101 B103 A202 B101 A203 B205 A104 B203 A302!
Café 1: side B
A103 B101 A104 B102 A105 B103 A205 B104 A203 B201 A102 B301!
Café 2: side A
A104 B101 A103 B102 A203 B105 A204 B103 A404!
Café 2: side B
A104 B105 A204 B101 A103 B102 A205 B404!
Café 2 Universal: White Door
A104 B105 A204 B103 A101 B104 A103 B204 A205 B303 A202 B101 A203 B402!
Café 3: side A and Wheel Door
A104 B106 A103 B105 A102 B104 A201 B103 A204 B206 A105 B203 A205 B204 A306 B405 A304 B303 A202 B101 A404 B302 A403 B402 A401 B304 A503!
Café 3: side B
A104 B106 A103 B105 A102 B104 A201 B103 A204 B206 A105 B203 A205 B204 A306 B405 A304 B302 A203 B301 A403 B304 A402 B101 A404 B105!
Café 03 Universal: side B and Wheel Door
A104 B106 A103 B105 A102 B104 A201 B103 A204 B206 A105 B203 A205 B204 A305 B102 A203 B302 A106 B405 A304 B303 A404 B205 A402 B403 A405 B503!
Library 1: Side A
A104 B101 A103 B201 A102 B203 A304!
Library 2: Side A
A101 B104 A301 B101 A103 B102 A105 B204 A303 B105 A403!
Library 2: Side B
A101 B104 A303 B102 A103 B101 A104 B304!
Library 2 Universal: White Door
A105 B103 A104 B105 A204 B101 A205 B201 A103 B301 A304 B102 A303 B401!
Library 3: Side A and Wheel Door
A101 B405 A403 B105 A402 B104 A401 B402 A501! or A503!
Library 3: Side B
A101 B405 A401 B406 A103 B105 A406 B505!
Theatre 1: Side A
A103 B105 A104 B103 A202 B104 A203 B102 A301! or 303!
Theatre 1: Side B
A102 B101 A104 B103 A101 B203 A105 B104 A103 B302! or B304!
Theatre 2: Side A
A103 B105 A102 B103 A304 B101 A102 B104 A405!
Theatre 2: Side B
A103 B104 A102 B101 A104 B203 A101 B204 A103 B302 A104 B402!
Theatre 2 Universal: White Door
A105 B104 A102 B101 A104 B203 A101 B204 A103 B302 A104 B305 A102 B405!
Theatre 3: Side A
A107 B101 A202 B101 A207 B105 A104 B102 A403 B104 A307 B102 A407 B105 A106 B201 A203 B105 A104 B103 A507!
Theatre 3: Side B
A105 B104 A106 B204 A107 B103 A104 B405 A103 B302 A207 B101 A202 B403 A105 B503! or B506!
Theatre 3 Universal: Side A and Wheel Door
A104 B101 A202 B103 A105 B102 A403 B202 A405 B101 A203 B201 A205 B107 A104 B105 A406 B202 A404 B107 A106 B104 A503 or A506!
Bridge Tower 1: Side A
A101 B103 A102 B104 A103 B105 A104 B102 A201 B203 A202 B201 A302!
BridgeTower_02 Side A
A101 B103 A102 B104 A103 B102 A201 B203 A202 B304 A105 B103 A205 B201 A305 B302 A405!
Bridge Tower 2: Side B
A105 B103 A104 B102 A103 B104 A205 B203 A204 B302 A101 B103 A201 B205 A301 B402!
Bridge Tower 2 Universal: White Door
A101 B103 A102 B104 A103 B105 A104 B102 A201 B203 A202 B304 A203 B205 A204 B302 A403!
Bridge Tower 3: Side A
A105 B103 A102 B104 A202 B203 A107 B106 A207 B206 A204 B305 A304 B303 A101 B105 A307 B406 A201 B202 A301 B304 A401 B404 A407 B401 A507!
Bridge Tower 3: Side B
A105 B103 A102 B104 A202 B203 A107 B106 A207 B206 A204 B305 A304 B303 A101 B105 A307 B406 A201 B202 A301 B304 A401 B404 A407 B405 A302 B503-506!
Bridge Tower 3 Universal: Wheel Door
A105 B101 A103 B102 A101 B102 A107 B106 A203 B201 A207 B206 A204 B305 A102 B105 A201 B202 A301 B104 A307 B405 A403 B301 A407 B405 A503!
Cathedral 1: Side A
A103 B101 A104 B102 A101 B105 A102 B104 A202 B201 A203 B204 A201 B203 A302 B301 A402!
Cathedral 1: side B
A104 B101 A105 B103 A102 B101 A103 B102 A204 B202 A203 B204 A303 B404!
Cathedral 2: Side A
A101 B103 A102 B104 A103 B105 A104 B102 A201 B204 A303 B404 A305 B403 A504!
Cathedral 2: Side B
A101 B103 A102 B104 A103 B102 A201 B204 A105 B101 A402 B501!
Cathedral 2 Universal: White Door
A101 B103 A102 B104 A103 B102 A201 B105 A104 B101 A105 B104 A202 B204 A303 B201 A402 B202 A401 B201 A304 B403 A501!
Cathedral 3: Side A
A102 B105 A204 B203 A101 B106 A103 B205 A202 B205 A203 B204 A303 B304 A302 B401 A304 B303 A504!
Cathedral 3: Side B
A106 B105 A204 B203 A102 B101 A103 B205 A202 B203 A205 B201 A107 B106 A304 B305 A307 B405 A306 B505!
Cathedral 3 Universal: Wheel Door
A103 B102 A106 B104 A102 B101 A107 B104 A101 B105 A202 B204 A203 B204 A205 B201 A204 B202 A301 B402 A303 B304 A302 B401 A402 B303 A502!
Bus Ride 1: Side A
A105 B103 A102 B101 A103 B104 A205 B102 A203 B105 A101 B204 A202 B205 A201 B202 A303 B305 A403!
Bus Ride 1: Side B
A105 B103 A102 B101 A103 B104 A205 B102 A203 B105 A101 B204 A202 B205 A201 B202 A303 B201 A302 B305 A301 B304 A305 B404!
Bus Ride 2: Side A
A102 B103 A105 B102 A205 B101 A104 B105 A202 B303 A101 B205 A302 B305 A103 B201 A402 B301 A203 B405 A502!
Bus Ride 2: Side B
A102 B103 A105 B102 A205 B101 A104 B105 A202 B303 A101 B205 A302 B305 A103 B405 A203 B505!
Bus Ride 3: Wheel Door
A101 B107 A102 B101 A202 B104 A201 B102 A203 B207 A105 B302 A107 B304 A402 B301 A502!
Bus Ride 3: Side B
A101 B107 A102 B101 A202 B104 A201 B102 A203 B207 A105 B302 A107 B402 A206 B407 A402 B501!
Train Ride 1: Side A
A101 B103 A104 B101 A202 B105 A104 B102 A303 B201 A302 B203 A402! or A404!
Train Ride 1: Side B
A105 B102 A205 B104 A101 B103 A105 B101 A202 B204 A103 B202 A301 B203 A302 B305 A104 B405!
Train Ride 1 Universal: White Door
A101 B103 A104 B101 A202 B104 A302 B105 A201 B102 A401!
Train Ride 2: Side A
A105 B103 A205 B101 A102 B105 A306 B102 A406 B104 A305 B203 A304 B205 A404 B202 A401 B204 A503! or A505!
Train Ride 2: Side B
A101 B103 A201 B104 A102 B105 A106 B102 A401 B106 A205 B203 A206 B205 A306 B204 A303 B404 A303 (or A305) B405 (or B403) A304 B505! (or B503!)
Train Ride 2 Universal: Wheel Door
A106 B103 A206 B101 A105 B102 A104 B106 A305 B104 A203 B204 A203 B202 A101 B105 A204 B302 A101 B203 A304 B402 A101 B205 A204 B403 A304 B405 A201 B206 A205 B404 A203 B502!
Windmill 1: side A
A107 B105 A102 B104 A203 B204 A201 B302 A403 B404 A207 B203 A504!
Windmill 1: side B
A107 B105 A102 B104 A203 B204 A207 B203 A407 B506
Windmill 1 Universal: White Door
A107 B105 A106 B205 A102 B104 A203 B204 A201 B302 A403 B404 A207 B206 A107 B105 A106 B203 A207 B206 A305 B301 A405 B401 A306 B207 A402 B501!
CHAPTER 2: GAME PATH
This chapter will talk about your path through the game and how it affects the ending. It will also cover the ending itself.
In the opening cutscene Oscar gives you his umbrella and enters the game world on his own through the Windmill Balcony door. Then it shuts behind him.

Figuring out where he goes from there is not easy. Behind the scenes he does take a specific path, largely invisible to you. Here are the parts of his path that matter...
Oscar’s Path.
Once Oscar is on the Windmill Balcony, he exits into the Wheel Of Doors. Where he goes from there is not known and isn’t significant, what matters is that at 5:00 he is at the Fountain encounter space, sitting down and reading a book. If you get to the Fountain at 5:00, this is the first time you can encounter him. After the Fountain, at 5:10 he can be seen walking down the Street. He goes up his own Bridge Tower, and is on the Bridge at 5:20. He makes it down to the Bus Stop at 5:30 and takes the bus. He probably gets off the bus somewhere, and eventually can be seen at the Bench encounter space, sitting on the bench, at 5:50. When it’s 6:00, he is walking along the Street sidewalk again. This time he travels to the Train Station and gets on the train, which leaves at 6:10. Eventually he makes it back to the Windmill Balcony at 6:30, where he stays and waits indefinitely. If you encounter him here, the game ends.
Your Path.
To get all 8, there’s a specific path you must take, and it is as follows.
After the two tutorial levels, you arrive at the Apartment Building puzzle. From there you must finish on side B to go to the Library. Then finish on side A to go to Bridge Tower. Side A of Bridge Tower is the only option, which takes you to Café. Finish Café on side B to visit the Library again. There you must finish on side B to go to the Fountain for your 1st encounter with Oscar, after which you’ll end up in the Theatre. Finish that on side B for your 2nd encounter on Street, which takes you to another Bridge Tower visit, which you must finish on side A to go up onto the Bridge for your 3rd encounter, and then to the Cathedral. There you want to finish on side A to get to the Bus Stop, where you have your 4th encounter as Oscar leaves on the bus you’ve just missed. You get on the next bus and must finish the Bus puzzle on side B to return to Café. You have to finish Café on side B to get to the Bench in time for your 5th encounter, which ends in another visit to the Theatre, which you must again finish on side B to have your second Street encounter, which is 6th overall. Back at the Bridge Tower, you must now finish it on side B to get to the Train Station. There, on the platform, you have your 7th encounter. Oscar waves to you, but the train doors shut before you can get on, as it leaves without you. You get on the next train, and finish the Train Ride on side A, to get to the Windmill puzzle. At this point you’re free to finish the Windmill on side A to get the last - 8th - encounter and end the game, or you can finish on side B to get to the Wheel Of Doors and explore more puzzles - you can always return to the Windmill puzzle and finish on side A to get your ending, since Oscar will remain up there indefinitely.
CHAPTER 3: ENDING
If you get to the Windmill Balcony any time after 6:30, Oscar will be there, and your final encounter cutscene will occur, followed by credits. This will conclude your current game. What happens in this final cutscene will vary depending on how many successful encounters you’ve had up to this point. There are 8 possible variations, all different from each other in subtle ways, with the main difference being how close the two characters get to one another. The more successful encounters you’ve had, the closer they’ll get. If you’ve gotten all 8, the windmill blades will stop spinning as the last of them turns orange. You can count the windmill blades that have turned orange for an indication of how many total encounters you’ve had. Additionally, after the credits you are presented with a windmill that counts out your encounter number one last time, and then you are taken to the Main Menu, where you now have access to New Game Plus (NG+).